Ten ways to keep WordPress secure
WordPress has an undeserved reputation for being insecure. This may have been a fair assessment in its infancy, but it is now a mature CMS, well maintained, and running more websites than any other. The quality and security of a WordPress-based website relies on the knowledge and approach of the developers, and any third-party code installed on the website. Our recipe for WordPress security is all about producing safe and secure bespoke WordPress websites, with no blind reliance on other developers’ code. It is in everyone’s interests not only that WordPress is secure and maintained, but also that WordPress developers understand security and use the system well. With that in mind, we’d like to share our security tips with you.
Castlegate IT’s Ten Pillars of WordPress Security
- Keep your site up to date
- If you’re not using it, get rid
- Don’t make anything guessable
- Plug in some security
- Connect securely at all times
- Protect users from themselves
- Don’t give anything away
- Put the passwords somewhere safe
- Train your users
- Keep yourself up to date!
Easier said than done? Here’s how:
1. Keep your site up to date
Keeping WordPress and any plugins on your site up to date is the single most important thing you can do to protect against attacks. Updates will protect you from many vulnerabilities. Since version 3.7 WordPress will by default conveniently and automatically update itself each time a minor version is released. But you will still need to check for major version updates and apply them as quickly as possible. The best way to stay abreast of the latest updates is to subscribe to the WordPress announcements mailing list.
WordPress also allows automatic updates for major versions, but you should use this option with care as major updates may cause compatibility issues with plugins and potentially break your website. You can enable major updates by placing the following into your wp-config.php file:
define('WP_AUTO_UPDATE_CORE', true);This constant has three potential settings, the default value of minor, which automatically installs minor updates only, true which automatically installs every update, or false which completely disables any automatic updates.
2. If you’re not using it, get rid
Over the years, websites can accumulate many different plugins, some of which you might not be using. Plugins can be insecure too, and every plugin you install provides a potential point of entry for an attacker. If a plugin is no longer in use, it should be deactivated and removed from your web server. We’d even recommend removing tools such as thumbnail regeneration plugins if you don’t need to use them frequently.
It goes without saying that you should try to keep the number of plugins you’re using to an absolute minimum. For the plugins you do need, it would be wise to evaluate each one. Take a look at the WordPress plugin directory and check each plugin is actively maintained and well reviewed. If you’re a PHP developer with knowledge of security, it’s worth reviewing the code and looking for potential problems or poor coding. If better supported alternatives are available, consider switching to them.
Themes can also accumulate. The standard WordPress install currently includes three default themes. It is not unknown for vulnerabilities to be found in these themes, and they will demand updating from time to time. Simplest just to be rid of them if you’re not using them.
Be ruthless with the users too
If your WordPress website has many different users, there’s a chance you have users on your website for staff that no longer require access. Perhaps certain users are no longer working for you, or are no longer involved in maintaining the website. Audit your user list to ensure nobody has access unless they absolutely need it, and no-one has more access than they need. Does that Editor need to be an Admin?
Do you need really remote access?
WordPress ships with an XML-RPC interface, which is a remote procedure call protocol mainly used to manage your WordPress installation remotely or from third party applications.
Unless you are explicitly using this feature, it should be disabled. The XML-RPC interface becomes a target for hackers attempting to guess your login credentials by brute force. In addition we’ve found constant bombardment of this protocol happens almost every hour of the day, and ultimately affects the web server performance due to the sheer volume of traffic attackers generate by visiting it.
For that reason, it’s best blocked before the request gets to your application layer. Apache users can do this with a small addition to your .htaccess file:
<Files "xmlrpc.php">
    Order Deny,Allow
    Deny from all
    Allow from 127.0.0.1
</Files>
Note we’re still allowing access from 172.0.0.1, the local server IP address. This is required because WordPress accesses the XML-RPC endpoint internally for certain tasks.
3. Don’t make anything guessable
Some aspects of WordPress’s famous five-minute install make things easier for attackers. When you install WordPress, a new administrator account is created with the username admin. Attackers commonly perform brute force login attacks, attempting to gain access by trying common usernames and password combinations. If your website still has the default admin user, you’ve effectively halved the work involved in such an attack by taking the username out of the equation.
If the attacker already knows an administrator’s username, they only need to attempt to guess the password. You should rename your admin user to something different or delete it completely.
WordPress does not allow you to change usernames from within its control panel, so you will need to connect to your database using phpMyAdmin, HeidiSQL or your preferred database editor. Find the wp_users table and update the username to something unique and secure. It’s as easy as that.
Change the WordPress table prefix
Another simple way to make things just that little bit harder for automated attackers is to change the database table names. Many attacks attempt to modify or access your database through SQL injection, a method of exploiting data-driven applications by inserting nefarious SQL statements into a form field or URL. Changing your WordPress database prefix will not protect you entirely from SQL injection but it can thwart common automated basic attempts to exploit unpatched vulnerabilities.
For a fresh WordPress installation, changing the prefix is a painless experience, just modify the $table_prefix variable in wp-config.php prior to installing. Choose a new prefix unique to the site in question and try not to reuse it for others if you maintain multiple websites.
$table_prefix = 'my_new_prefix_';Changing the prefix on an existing site is an arduous process due to WordPress storing references to the prefix in a couple of tables. To get started you’ll need to change the $table_prefix variable shown in the previous step. Now you’ll need to run two SQL queries to update database references to the old prefix.
Load up your preferred database editor, (HeidiSQL or phpMyAdmin if you don’t already have one) and connect to your database. Take a complete backup first; there’s potential to mess this up if you make a mistake.
Begin by updating the names of each table, swapping wp_ for your chosen prefix. Next, run the two queries shown below. Modify the queries with your new and old prefixes before your run them. Make sure you backup first! The parts you need to change are underlined.
UPDATE `my_new_prefix_usermeta`
    SET `meta_key` = REPLACE(`meta_key`, 'wp_', 'my_new_prefix_');
UPDATE `my_new_prefix_options`
    SET `option_name` = 'my_new_prefix_user_roles'
    WHERE `option_name` = 'wp_user_roles';
Use high entropy passwords
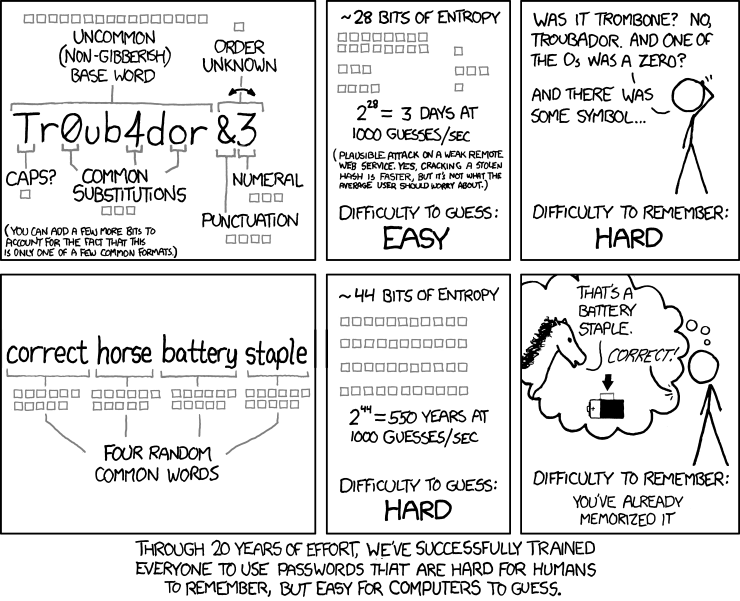
Contrary to what you may have learned – and been forced to do repeatedly – over years of experience on the web, a secure password doesn’t have to be a difficult-to-remember mess of uppercase letters, lowercase letters, numbers and special characters. A secure password is one with a high amount of entropy, which put simply is a measure of how unpredictable a password is.
Password requirements, such as those above, are a fallacious solution to ensuring users have high-entropy passwords; they have caused a widespread misunderstanding of what exactly a secure password is. They quite often also encourage poor password practises – because passwords generated to meet such requirements are hard to remember, users often have one or two of such passwords that they re-use, or indeed just write the passwords down.
A secure password needs to be difficult to predict. You can achieve this in one of two ways:
- Have a short password, but using characters drawn from a wide space (this is the origin of the drive to include lowercase letters, uppercase letters, numbers, and special characters)
- Have a long password.
Ignore that first option, and just opt to have long passwords. A long password can be anything you want. Throw a few random words together, make up a story in your head to link them together, and you’ll have a secure password you can remember for a good while.
4. Plug in some security
There are dozens of plugins which will make your installation more secure. Some of the more popular ones include WordFence, All in One WP Security & Firewall, iThemes Security and Sucuri. Security plugins such as these address common vulnerabilities which many automated attacks will be attempting to exploit, and so installing one will improve your website security.
Of the plugins mentioned above, we cannot testify as to the effectiveness, or endorse any of them. You’ll need to make your own judgements as to which is best suited for your website. Take some time to study the feature lists and try to understand and educate yourself as to the issues they protect against.
Two factor authentication
Two factor authentication is a method of confirming a user’s identity by using two different authentication components. Typically this means entering your username and password, followed by a one time password which is sent to your email address or mobile phone. This extra step makes unauthorised authentication harder by requiring access to a user’s email account or mobile device.
Two factor authentication is an important step in protecting your website. Of the hundreds of WordPress sites we’ve developed, we’ve had a small number hacked. Of these hacked sites, almost all have been the result of stolen login credentials. It’s difficult to say with complete certainty, but all indications suggest that these credentials were stolen by malware on the client’s computer.
Using two factor authentication will help prevent stolen credentials being used to compromise your website. It also helps to protect against brute force login attempts and the use of weak login credentials. There are many two factor authentications available in the WordPress plugin directory for you to try.
Protection against brute force login attempts
This is one must-have feature for your security plugin. As the previous sections explain, weak login credentials can leave you vulnerable to attack from automated login attempts. Brute force login attacks hit your login form with a constant stream of requests, where the attacker tries many different username and password combinations. Many of our websites are attacked like this on a daily basis, and typically receive up to ten login requests per second.
Two factor authentication add an extra layer of protection to your WordPress login, but it will not prevent automated bots from trying username and password combinations. If you’ve not configured two factor authentication, you ought to put some brute force login protection in place. Even if you do have two factor, some additional brute force protection will reduce the load and strain on your server when this kind of attack is underway.
The concept of brute force login protection is simple; if an IP address fails to log in a certain number of times within a short timeframe then block them and prevent them from trying again. There are a few plugins available which allow you to do this, but a good one would send a HTTP 403 header once an IP address is blocked.
If you’re sending the 403 header to blocked IP addresses, the web server needs only send a basic “Forbidden” message back to the attacker, with minimal mark-up and an overall small response. Plugins which still display the login screen even after blocking are still sending the full WordPress login page markup, associated CSS and JavaScript files, not to mention numerous SQL requests made by PHP. If you’ve blocked an attacker they will continue sending requests regardless, so the less data you send back to them each time, the better for your server and its performance. And the attacker is more likely to stop sooner if they start getting some form of server error.
Be careful how you configure your chosen plugin. Blocking a user for an hour after three failed attempts within five minutes will be a nuisance to genuine but forgetful users. The real aim of this protection is to slow down the attacks, making them less effective. Therefore blocking for one minute after five failed attempts with one minute would be more than adequate and reduce attack attempts to just five per minute, rendering the attack inefficient and ineffective.
5. Connect securely
As we’ve already set, strong code won’t protect you if your login credentials leak out. Even if you have two-factor authentication, you don’t want those being found out, given how often users reuse passwords.
Install an SSL certificate
An SSL security certificate is used to encrypt data sent between your computer and the website you’re accessing; this means any data you enter into a website is sent as securely as possible. In theory, without a security certificate, any computer on the network between your computer and the website you’re accessing, can intercept the data you send.
There was a time when you only saw security certificates in use on websites which required high security, such as online banking or ecommerce websites. Now it’s become common place to have one of your own.
Any website which collects sensitive information, such as usernames, passwords or personal details would do well to install one. The only downside of doing so is an insignificantly minor performance hit (traffic over https is slightly slower due to the encryption) and the cost of the certificate itself. As for the benefits: you’ll be collecting data securely from your users, increasing their trust and Google uses SSL as a ranking factor too.
Your hosting provider will be able to supply you with a security certificate. Once you’ve installed one, you’ll need update WordPress to use the new https protocol instead of http in its URLs. As you’re not changing the URL completely, you’ll be able to login and access the “Settings” > “General” page and update your URL accordingly.
WordPress and certain plugins will store your website address in the database, so these still need to be changed. You can use the free search and replace tool from InterconnectIT to find and replace the old address with the new one.
Use secure FTP connections
Most of the security pointers we’ve provided in this article are completely redundant if you’re not careful about how you connect to your website and update it. FTP, the File Transfer Protocol was never designed to be a secure means of transferring files.
Every time you connect to an FTP server, your login credentials and files are sent over the network in plain text and there’s potential for them to be intercepted by other computers on your network, or any malware installed on your computer. If this happens then your website may become compromised.
Many hosts now allow you to connect via FTPS which is FTP secured by SSL/TLS, or SFTP which is technically not FTP all, instead it’s the SSH File Transfer protocol. Both methods add a layer of encryption to the data you’re transferring and should be used in favour of plain insecure FTP.
Another factor to consider is the security of the FTP client you’re using to transfer your files. Many years ago, one of our members of staff fell victim to a vulnerability in PDF documents which allowed the distribution of malware. This malware stole login credentials from their FTP client’s configuration file and subsequently infected a number of websites. Since then, the FTP client in question has put some extra measures in place to obfuscate the passwords it stores, but it’s still not a bulletproof approach to password security.
It’s worth investigating how your FTP client stores its login credentials to satisfy yourself they are held securely. If you’re still unsure or want to be extra cautious, you can avoid storing them on your computer entirely.
6. Put the passwords somewhere safe
Continuing the theme of protecting your credentials, how and your users store passwords is a critical issue to consider. It may be that you have limited influence over how your users work, but you can at the very least set a good example.
Don’t email credentials
We all know, in the abstract, that email is as about secure as a postcard. And we also know that everyone still emails credentials to users. But at the very least, consider sending the usernames and the passwords in different emails. Unless you’ve already followed our advice on two-factor authentication, in which case: well done.
Secure your wp-config file
It’s not just the login credentials that matter – your database login is stored in WordPress’s PHP code. A common tactic for improving WordPress security is to move your wp-config.php file into the directory above your WordPress installation. For sites which are installed in the root directory, this means moving it outside of the website’s root folder where it’s no longer publicly accessible.
Many people argue this has minimal security benefits; however there are very real edge case situations where files may be served to a visitor by the web server without any PHP parsing taking place. If this occurs, then your configuration file can be read as plain text and all database credentials are immediately compromised.
WordPress automatically looks one directory above its installation directory when including the configuration file, so simply move it up a directory and you’re done.
7. Protect users from themselves
So far we’ve been talking about protecting your sites from intruders. But there’s still plenty that can go wrong with a site as the result of the actions of an authorised user. There’s plenty that the enthusiastic site editor can do that will impact security and potentially get a site hacked. Here are a few things you can do to limit the potential damage.
Block PHP execution in uploads directory
Blocking PHP in your WordPress uploads directory is an important step in protecting your website. Uploaded content poses a significant risk in any web application. Plugins or themes which are loose with their security may allow unchecked uploads. If anyone manages to upload a PHP file to your media library, they will be able to execute it and potentially manipulate, create or delete files as they wish.
Another small addition to your .htaccess file will protect against code execution from uploaded files. It’s important to note this would not protect the files from being uploaded in the first place – so check those plugins!
<Files "*.php">
    Order Deny,Allow
    Deny from all
</Files>
Disable theme and plugin editing
WordPress allows the editing of themes and plugins code from within its control panel, and it’s a feature many people do not need. We disable this option in all of our WordPress installations and you’d be wise do the same if you’re not making use of it.
The theme and plugin editor is one of the first places an attacker will look if they gain access to your control panel. It allows them to escalate their attack and gain unrestricted access to your files, granting them the ability to modify and execute any code they wish. Thankfully disabling it is a straight forward task.
Place the following lines in your “wp-config.php” file:
define('DISALLOW_FILE_EDIT', false);
define('DISALLOW_FILE_MODS', false);
8. Don’t give anything away
There are many ways that WordPress gives away information useful to hackers. For instance, it’s usually relatively easy to identify that a site is running WordPress, and which version. That’s very difficult to conceal, but there are a few issues that are worth the effort of tackling.
Prevent username exposure
Believe it or not, it’s relatively easy to gather a list of usernames registered to a WordPress installation. Automatic author archives are generated for each user, and you can test if you’re vulnerable by visiting http://domain.com/?author=1. When a username is found for the author ID in the URL, you will notice the page is redirected to http://domain.com/author/admin, where admin is the usual username for the user with an ID of 1.
Attackers can send a series of requests like this, simply incrementing the ID number and looking for the redirected URLs until they’ve gathered a complete list of usernames registered to your website.
If you do not need author archives, you can disable this behaviour by adding the following code to your theme’s functions.php file. The example below completely blocks author archives, returning a 404 page instead of redirecting.
// Return 404 for all author queries
add_action('wp', function ($wp) {
    if (
        count($wp->query_vars) == 1 &&
        (
            array_key_exists('author', $wp->query_vars)
                || array_key_exists('author_name', $wp->query_vars)
        )
    ) {
        global $wp_query;
        $wp_query->set_404();
        status_header(404);
    }
});

// Never return author URLs
add_filter('author_link', function ($link) {
    return get_bloginfo('url');
}, 10, 1);

// Prevent the_author_posts_link() from returning a link
add_filter('the_author_posts_link', function ($link) {
    return strip_tags($link);
});
Another potential for username exposure occurs when new users are created, but no “display name” is selected. The WordPress display name is a friendlier version of the user’s name. Only after creating a user you can change the display name, so it’s often left to the default. When editing the display name, you can choose from their first name, their first and last name, but it defaults to the user’s username. If you’re crediting posts to an author you may well be displaying their username. Even if you keep author names hidden in your post templates, the display name still appears in WordPress’ various archives and XML feeds.
The following addition to your theme’s functions.php file will set a user’s display name to a value of your choice if their display name is equal to their username. For this example we are changing our user’s display names to anonymous.
add_filter('the_author', function ($name) {
    $user = get_user_by('login', $name);
    if (!$user) {
        $name;
    }
    return 'anonymous';
});
Disable PHP error reporting
Many hosting providers have PHP errors enabled by default. This is useful for development but terrible for security on production environments. Every time a PHP error is thrown, it’s displayed on your website. Error messages expose information about your website’s code and your servers file structure. Some plugins may even output a full stack trace, detailing each function call leading up to the particular error.
The information exposed in errors can be used to make exploiting your website easier. Unfortunately there’s no single way to disable error reporting, and exact methods will differ from host to host. You’ll need to try a few of these methods and see which one works for you.
If you’ve got access to edit your php.ini configuration file, this is the preferred method. Some hosting providers allow you to create your own custom php.ini and place it into your website’s root directory. If your provider allows this, remember to block public access to this file. The lines you need to change in your configuration are:
display_errors = Off
display_startup_errors = Off
If editing the “php.ini” file is not an option for you, many hosts allow you to configure these values from your .htaccess file. Add the following lines to your .htaccess file, and be sure not to include them between the # BEGIN WordPress and # END WordPress lines, as the content here can be overwritten by WordPress.
php_flag display_errors off
php_flag display_startup_errors off
If neither of those methods work for you, the last attempt is to disable error reporting from with PHP itself, using the ini_set() or error_reporting() functions. The downside to this approach is that parse errors (syntax errors) in your code will prevent PHP from being able to parse and execute a file; this means it does not parse your functions which turn off the error reporting, and so errors still display. If this is the only way you can disable error reporting, it’s better than nothing. Add the following to your wp-config.php file.
error_reporting(0);Finally you should confirm that it your error reporting is successfully turned off. The easiest way to achieve this is to trigger an error deliberately. Try echoing a function which does not exist somewhere in your wp-config.php file.
echo castlegateIt();With error reporting still enabled, you’d see a fatal error stating you’re using an undefined function. If error reporting is off, you’d be presented with a blank screen which is preferable to exposing sensitive data.
9. Train your users
If you’ve followed every step in this guide, great work. You’re done a good job to help make the web that much safer for all of us. But that work will be magnified if you explain why you’ve done these things to your users. Why are you sending that password in a separate email? Perhaps your user doesn’t know how completely insecure email is. Two-factor authentication may seem burdensome – so make sure they know why it’s there. And those memorable long passwords make good conversation starters.
Ultimately the security of the web depends on our ability to identify the threats and educate each other. Don’t wait until something goes wrong before you have these conversations.
10. Keep yourself up to date!
Threats, vulnerabilities, and solutions are continually changing. It’s a lot to keep track of but you should make the effort to keep up with the basics at least. Read those release notes from the new versions of WordPress. Have a browse of the WP Vulnerability Database every so often, and don’t forget to include sites like Threatpost from Kaspersky or The Register in your media diet.
We’ve learnt a lot about WordPress security over the years and we follow these steps and more to ensure our client’s websites are protected. You may be interested in reading our security methodology as an approach to your WordPress development.
If you’d like to know more about the attacks your websites receives, we’ve written a simple overview of why websites get hacked.